

Installation Tips
GPS Trackers for Fleets & Assets
Unlock Efficiency, Control Costs, and Drive Success.
GPS Installation Concepts
In situations where customers need assistance with a GPS installation, Fleetistics can provide installation services through a network of GPS installers. This allows Fleetistics to support customers in almost every part of the United States and Canada. For those wanting to DIY, Fleetistics offers many resources to help a customer be self-sufficient and save money.
With the introduction of OBD GPS trackers many customers opt to do their own installations to save time and money. An OBD device can be installed in 20 minutes in most vehicles once a few have been completed. If in doubt, contact a professional installation company.
If wiring the GPS device is needed, it is better to hire a professional who is familiar with proper connection points to avoid damaging a vehicle.
GPS Device Install
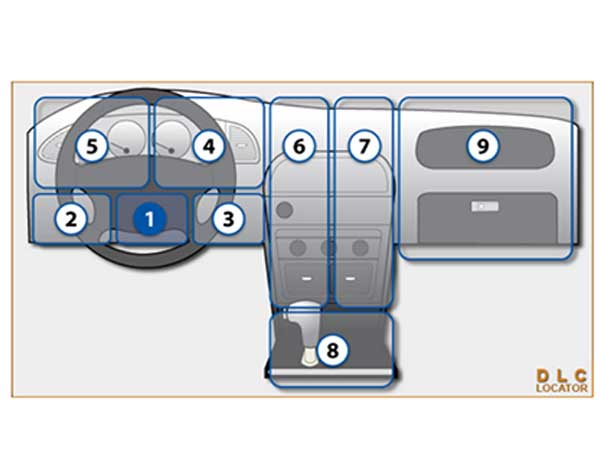
OBD Port Locator
Troubleshooting
Geotab Install Checker
Geotab Sat IRD Install
Geotab GO9 Specs
Wireless Tracker Install

Add a Dashcam to Your Fleet
- Reduce your accident liability
- Reduce your fleet insurance
- Protect your drivers from false claims
- Coach drivers on wanted behavior before there is an issue
CrewChief Dashcam Quick Start Guide
If you don’t know, hire a pro
If you are not comfortable with removing paneling or tinkering around inside the dashboards of vehicles, you may want to consider hiring a professional installer to initially set up your fleet. Why end up having to pay more in the end for something because you tried to save money on the first DIY attempt? That being said, if you are going to be installing the OBD type GPS trackers you really cannot mess it up unless you break a piece of plastic on the vehicle while being a bit too rough.
A basic GPS installation of an OBD tracker is as simple as inserting it into the OBD port. However, for speed, efficiency and accountability if you would prefer to hire a professional installer we can help you find a reputable company close by with their own facilities or the ability to travel to your location(s).
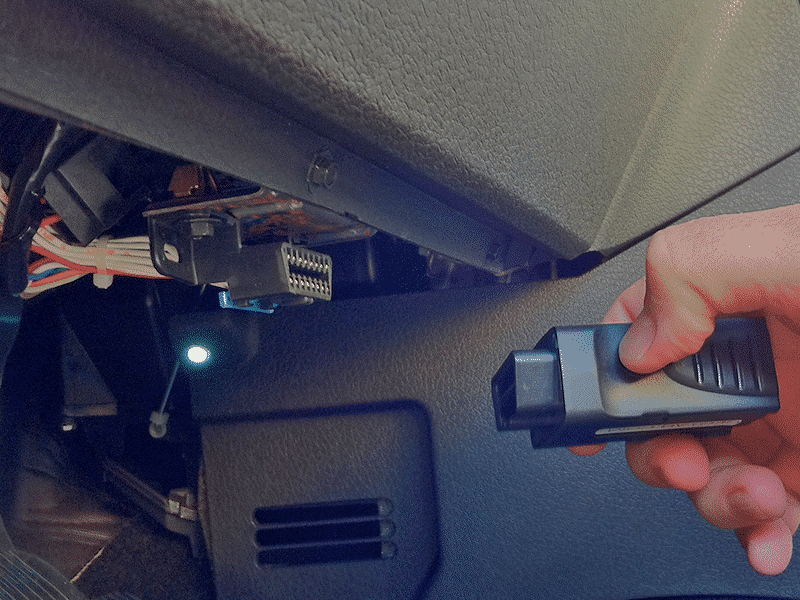
OBD GPS Vehicle Tracker
There are pros and cons to the simple installation of GPS devices in the OBD port. Serial number zip ties can be used in an effort to discourage employee tampering with devices but it can become a game of cat and mouse.
Placing the GPS device in the OBD port is a fine way to start to see how it goes. If you run into excuses and issues, get a Y-harness. This avoids spending money on Y-harnesses before you know they are needed.
Most fleet managers are opting to install an OBD tracker with a Y-harness. This leaves the OBD port available for future maintenance without removing the GPS tracker. The GPS tracker can then be secured in the dash to avoid accidental removal.
Securing the device to the vehicle is important to receive quality accelerometer data. If the GPS device moves independently of vehicles frame, you will get a lot of false positives. In extreme cases the GPS manufacturer will deactivate the accelerometer due to excessive network traffic.
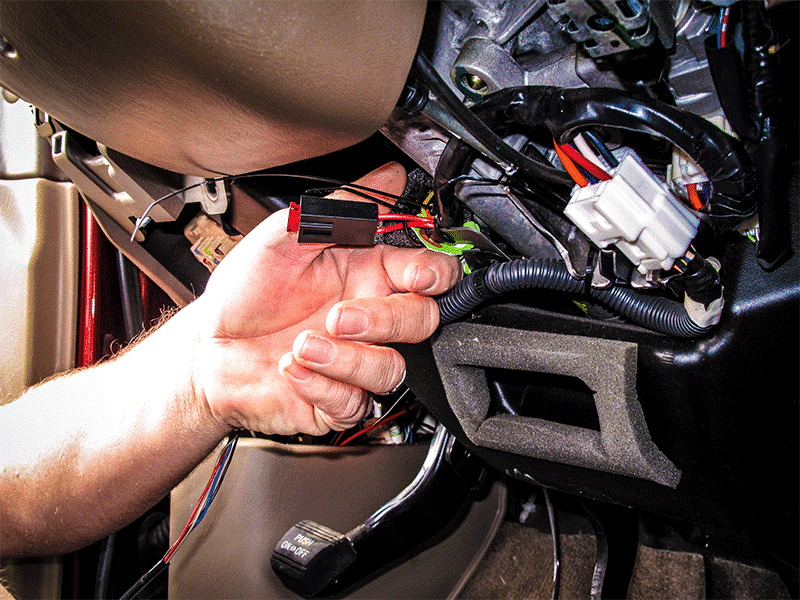
GPS Fleet Tracking 3-Wire Install
3-wire installations are definitely more challenging and take more skill and experience. These types of installations are most often done by professionals or people with automotive experience. If you do this wrong, you can end up damaging the vehicle.
Modern vehicles have a lot of expensive computers. Connecting to the wrong wire could result in damage or a safety issue not covered by the manufacturer warranty. Outsourcing the installation generally means the work can be done at night or on weekends to avoid impacting operations.
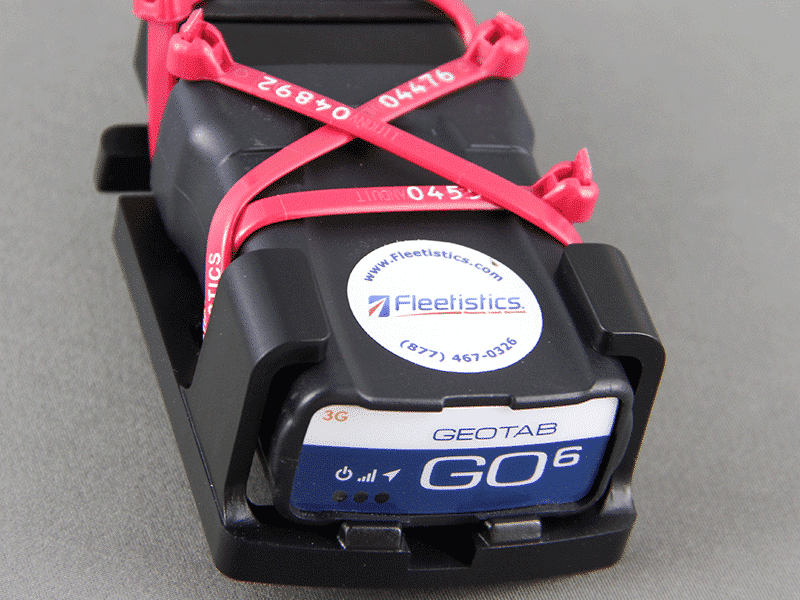
GPS Tracker Mounting Bracket
The install bracket is a very simple, but important component, although it may not always be required. The GO GPS device snaps into the bracket and can be secured with zip ties as shown. The bracket is mounted to the frame of the vehicle using more zip ties or automotive tape. The ensures the GPS device moves with the frame of the vehicle. If the GPS device is not firmly mounted to the frame you will get excessive vibrations resulting in bad accelerometer data.
3-Wire GPS Tracker Installation Tips
Install Tips Part 1
- Always follow the manufacturers’ instructions. These instructions do not supersede the manufacturers’ instructions.
- Inventory all parts on receipt. Check for damage or missing components.
- Always use a 3 to 5-amp in-line fuse to protect the unit from damage and prevent damage not covered by warranty.
- Install real-time units as quickly as possible. Real-time service billing starts within 14-days of the units being delivered.
- Use Torque Seal on connections or a serial number zip tie to identify tampering issues. OBD devices do not require this step.
- Connect wires using the poke and wrap connection method or double bladded Scotch Locks. Do not use T-taps or single blade Scotch Locks; they work loose over time.
- Always use a multi-meter to find your connection wires.
- Make sure wires are not pinched or repeatedly closed in doors.
Install Tips Part 2
- Install GPS unit behind the radio, in the OBD or J-Bus port or near the steering column.
- For 3-wire installs, make sure GPS unit gets constant 12v power even when the ignition is off by testing with a multi-meter. Watch the power when the vehicle is started and shut down. Some power leads can lose all power during starting which will cause problems with the GPS systems. It should not dip below 9 volts.
- For 3-wire installs, make sure you have a good ground secured with a screw and Torque Seal.
- For 3-wire installs, if using switched power test, test the power as the ignition is turned on and off.
- Do not block or cover the GPS antenna with metal.
- For 3-wire installs, the optimum location for the cellular and GPS antenna is on the windshield of the vehicle.
- Antennas are directional; make sure it is facing up and lying as flat as possible. Secure them in place with 3M automotive tape or zip ties or a mounting bracket so the device moves with the vehicles frame.
- For 3-wire installs, secure antennas placed inside the dash so they don’t shift at a later time and create a communication issue.
- Make sure the GPS system is operating correctly before closing up the dash. Check lights, tones, on-line display or sample data depending on system. This may require driving the vehicle for 3-5 miles in poor cellular coverage areas.
- For 3-wire installs, never tap into wires that may impact the safety of the vehicle such as an airbag wire. Steering columns is generally the best option.
Rosco Vision System Dashcam Installation
Installation of the Rosco video camera system can be done by any competent 12 volt installer. Customers will often do their own installations if they have good mechanics on staff or choose to outsource if they do not or have a rather large deployment. There are a few key steps that are very important to the installation, moving and servicing of the cameras to be sure they are ready when you need them the most.